How to manually renew your LetsEncrypt SSL cert using certbot

AWS Lightsail does not support auto-renew of LetsEncrypt SSL certificates using certbot, to automatically update your LetsEncrypt SSL certificate bncert
If you have to use certbot or you have already created your LetsEncrypt SSL cert using certbot without realizing certbot is not supported, you have two options.
- Re-create your SSL certificate using
bncert. - Manually renew your SSL cert via
certbotevery 3 months.
In this walkthrough, we will cover how to renew your cert by running a few copy-paste ssh commands.
Renew LetsEncrypt SSL cert manually using certbot
First, ssh into your Lightsail instance and then pass the domain name as a variable like this:
DOMAIN=forwardforce.ioReplace forwardforce.io with your own domain. From here on down, you can just copy-paste all commands since they conveniently reference the DOMAIN variable.
Next, we will make it so that the SSL cert will cover all of your subdomains by running the following command:
WILDCARD=*.$DOMAINNow, you are ready to renew your certificate like this:
sudo certbot -d $DOMAIN -d $WILDCARD --manual --preferred-challenges dns certonlyThis will prompt a confirmation dialog, you have no choice but to agree by saying Y and move to the next step. The next step is to perform DNS verification by adding a text record that the command above will produce that looks like this:
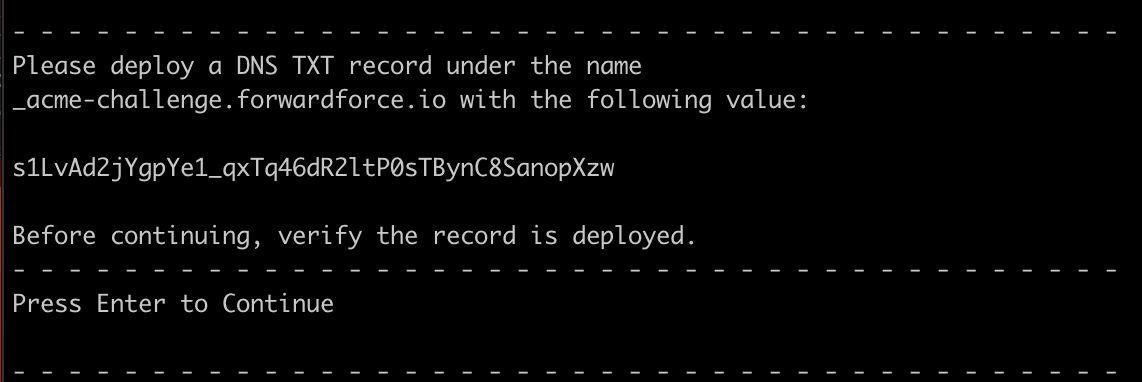
You will need to add the text record to your DNS manager; it may need 10 mins for the record to start propagating. If you are using Route53, however, it will start propagating almost immediately. Simply press Enter to continue. If you are running into issues with this step, check if the DNS is propagating properly by using your favorite DNS checker, such as MxToolbox.
This will generate your new certificate, and now you have to replace the old one by running the following 2 commands:
sudo ln -sf /etc/letsencrypt/live/$DOMAIN/privkey.pem /opt/bitnami/apache2/conf/bitnami/certs/server.keysudo ln -sf /etc/letsencrypt/live/$DOMAIN/fullchain.pem /opt/bitnami/apache2/conf/bitnami/certs/server.crtFinally, just to be extra safe, bounce the ctlscript.sh service like so:
sudo /opt/bitnami/ctlscript.sh restartYou are done! Please verify that the certificate is valid for an additional 3 months. Come back to this article after 3 months and do it all over again 🙂